

Triple Your Garage Door Torsion Spring Cycle Life
It’s incredibly important to make sure your garage door stays up and running. Increasing the cycle life of your garage door torsion spring is a valuable way to ensure your garage door continues to function longer. The standard torsion spring lasts approximately 10,000 open and close cycles, which is about 7 years of everyday use. Increasing the cycle life of your torsion spring will not only limit the possibility of injury or damage but prevent you from having to replace it sooner than expected. In this article, we will go over the different variables that make up the cycle life of a garage door torsion spring. Upgrading to a longer-life torsion spring will change the dimensions of the spring employed. We at Garage Parts Plus will do our best to make sure your torsion spring fits perfectly and last for years to come.
What is IPPT and Why is it Important?
To start off, you need to understand the importance of IPPT(Inch Pounds Per Turn). IPPT is the torque/power delivered to the shaft for each turn of the torsion spring. This, along with your garage door opener, will determine how strongly or weakly your garage door opens and closes. When replacing or substituting your torsion spring you need to make sure the replacement spring has an identical IPPT to the one you currently have, or as close to it as possible. If the IPPT is too strong or weak it could lead to potential damage, injury, or premature replacement of your torsion spring. You must also make sure that the new spring has at least as many Maximum Turns as the original spring. A spring’s IPPT is determined by dividing the spring’s constant (change in torque required to twist the spring through an angle of 1 radian (approx. 57.3 degrees)) by the number of active coils. In order to upgrade the lifecycle of your torsion spring while maintaining the same IPPT, we must consider how the wire gauge, inner diameter, and coil-to-coil length will need to be adjusted.
Upgrading Spring Dimensions
The variable that affects your torsion spring’s cycle life the most is its wire gauge or thickness. A higher wire gauge means a thicker wire and an overall stronger spring. Increasing the wire gauge will increase the durability of the spring causing it to last longer. Although increasing the wire gauge will make your spring stronger, there is more to upgrading your torsion spring than increasing wire gauge. That is because, as previously stated, we need to keep the required IPPT in mind. In order to do this, we need to think about the spring’s coil-to-coil length when switching to a higher wire gauge. When a spring’s wire gauge is increased the overall length of the spring must also be increased to have the same IPPT. For garage doors with a long enough shaft, these should be the only adjustments needed to increase the torsion spring’s cycle life, but for garage doors with limited shaft length, another adjustment may be needed for the inner diameter. Increasing the inner diameter of the spring will allow you to increase the spring's wire gauge but still be able to fit the spring on the shaft. In other words, increasing the inner diameter will shorten the length of the spring. Having a spring that fits properly on your garage door is extremely important, so we must be careful not to install a spring that is too long or too wide.
Upgrade Example
Below is a chart that shows how a garage door torsion spring’s cycle life can be upgraded by adjusting its wire gauge, inner diameter, and length while maintaining the same IPPT and Maximum Turns.

If your goal is to increase the cycle life of your garage door torsion spring, DURA-LIFT Door Hardware has everything you need. The new or replacement spring may fit differently than your original spring. However, if the wire gauge, inner diameter, and coil-to-coil length are adjusted to the same IPPT as the original spring (or close to it), then your garage door should give you many years of dependable service.

How to Safely Maintain Garage Door Torsion Springs in 5 Easy Steps
This post has everything you need to know about torsion springs so you can handle them with confidence and keep you and your home safe.
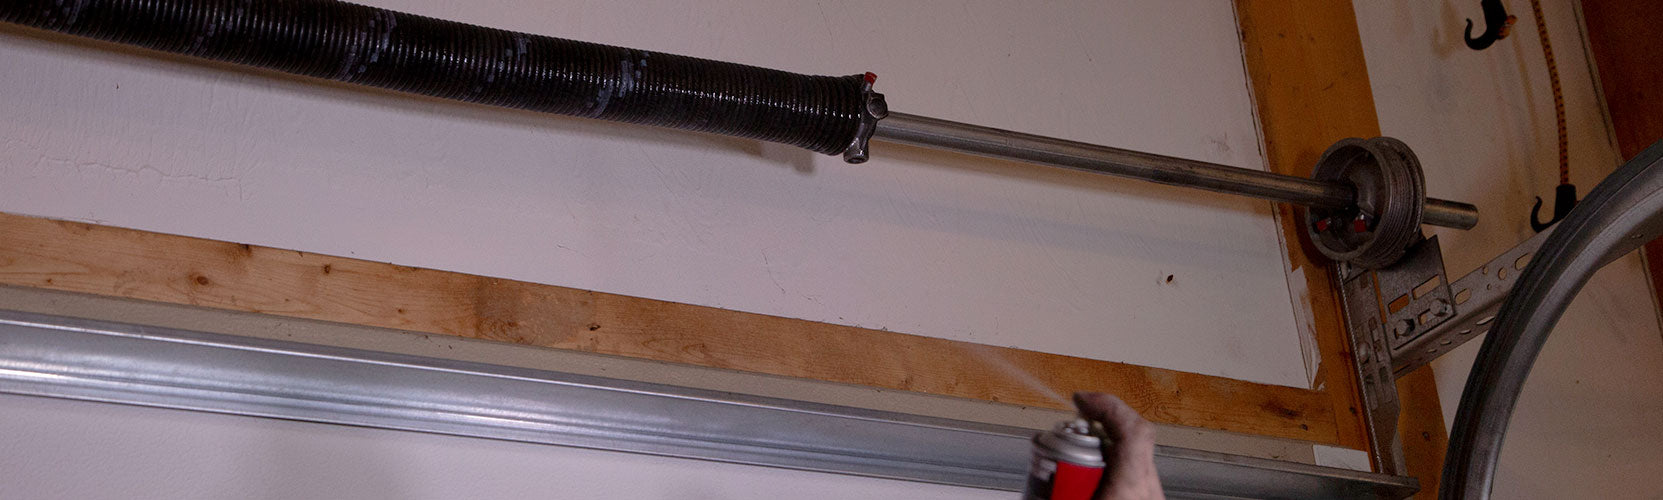
1: What’s that noise?
If your torsion springs are squeaking whenever you open or close your garage door, applying lubricant can help reduce the noise. We also recommend applying lubricant once every three months for routine maintenance. Lubricant penetrates and neutralizes rust, and cleans corrosion and oxidation on your garage parts, which helps your door operate more smoothly and quietly.
Sometimes squeaking is an indication of a bigger problem, so if the noise persists, contact a professional to inspect your door.
2: Just right
Torsion springs are specifically designed for certain garage door sizes and weights. Always use replacement springs with the same size and specifications as the existing springs to ensure the safety of you and your property. When selecting an overall length, you can safely go up or down by one inch, if necessary. Otherwise, do not try to compensate by using a different wire gauge or size.
Can't find the exact size that you need? Build a custom torsion spring here.
Learn how to find the correct torsion spring replacements for your garage door.
3: Two is better than one
Always replace both torsion springs at the same time, even if only one is broken. This ensures that the tension remains even on both sides.
Torsion springs are designed to last for about 10,000 open-close cycles or 7 years with average use. High cycle torsion springs are designed to last even longer. Visit our torsion spring page for standard cycle to high-cycle spring conversions.
4: What goes up must come down (and vice versa)
After installing new torsion springs, be sure to check that they are wound correctly so that your garage door will function properly. To test this, lift the door up halfway.
If the door moves down by itself, the springs aren’t wound enough. In this case, wind the spring one or two more quarter turns.
If the door moves up by itself, the springs are wound too tightly. In this case, unwind the spring by one or two quarter turns.
If the door balances in the half open position, the springs are wound correctly.
5: When in doubt, hire a professional
Torsion springs store a significant amount of energy and hold the weight of your garage door. Trying to adjust, remove, or replace torsion springs without the proper knowledge or tools can result in serious injury or damage to your property.
Always hire a trained door technician to perform any work on your garage door’s torsion springs if you have any doubts about your own abilities to do so. When removing or replacing torsion springs by yourself, always follow instructions carefully, take the recommended safety precautions, and use the proper tools.
With these safety tips in mind, you're ready to adjust or replace your torsion springs with ease and peace of mind.

How to Replace Your Garage Door's Torsion Springs Like a Pro
When your torsion springs break, you're left unable to open and close your garage door, which can be a big inconvenience to you and your family. Fixing your broken garage door springs by yourself can save you the time and money of waiting for a professional.
Torsion springs should be replaced with springs of the same size and specifications as the existing ones. Do not try to overcompensate with a different wire gauge or length. Learn how to select the right torsion springs for your door here.
Once you have your new torsion springs, you're ready to install them. We recommend hiring a professional, but if you feel comfortable doing so by yourself, be sure to follow all instructions carefully, take all safety precautions, and use proper tools. We are not responsible for any accidents, injuries, or damage that may result from this process.
Learn how to install your new torsion springs with our step-by-step guide below, and check out our video tutorial for further instruction.
You will need:
- DURA-LIFT torsion springs
- 2x winding rods
- Socket wrench
- Drill
Step 1: Disengage the opener
Disengage your garage door opener to ensure that the door won't open by itself during installation.
Step 2: Unwind set screws and loosen old torsion springs
Using the winding rods, unwind the torsion spring until you can easily access the set screws. Use a socket wrench to loosen the set screws enough so that they are no longer gripping the torsion spring.
Continue unwinding the the torsion spring quarter turn by quarter turn using the winding rods. Repeat until the spring is completely unwound and no longer has any tension.
Step 3: Unbolt stationary cones from bracket
Once both springs are unwound, use a drill to unbolt the stationary cone of each spring from the center bracket.
Step 4: Loosen cable drums from rod
Use a wrench to loosen the set screws on each cable drum. Disconnect the cable from the drum at the top of the door and the bracket at the bottom of the door.
Slide the drum off of the torsion bar and set to the side. Remove the old springs from the torsion bar by sliding the bar slightly out of the bearing plate. Repeat on each side.
Step 5: Slide new torsion springs onto the torsion bar
Slide each torsion spring onto the torsion bar the same way you removed the old springs, with the stationary cone toward the center.
Then, slide the drums back onto the torsion bar and place the bar back into the end bearing plate. Use a wrench to tighten the screws on each drum.
Step 6: Bolt springs together at center plate
Use a drill to bolt the stationary cones of each torsion spring to the center plate.
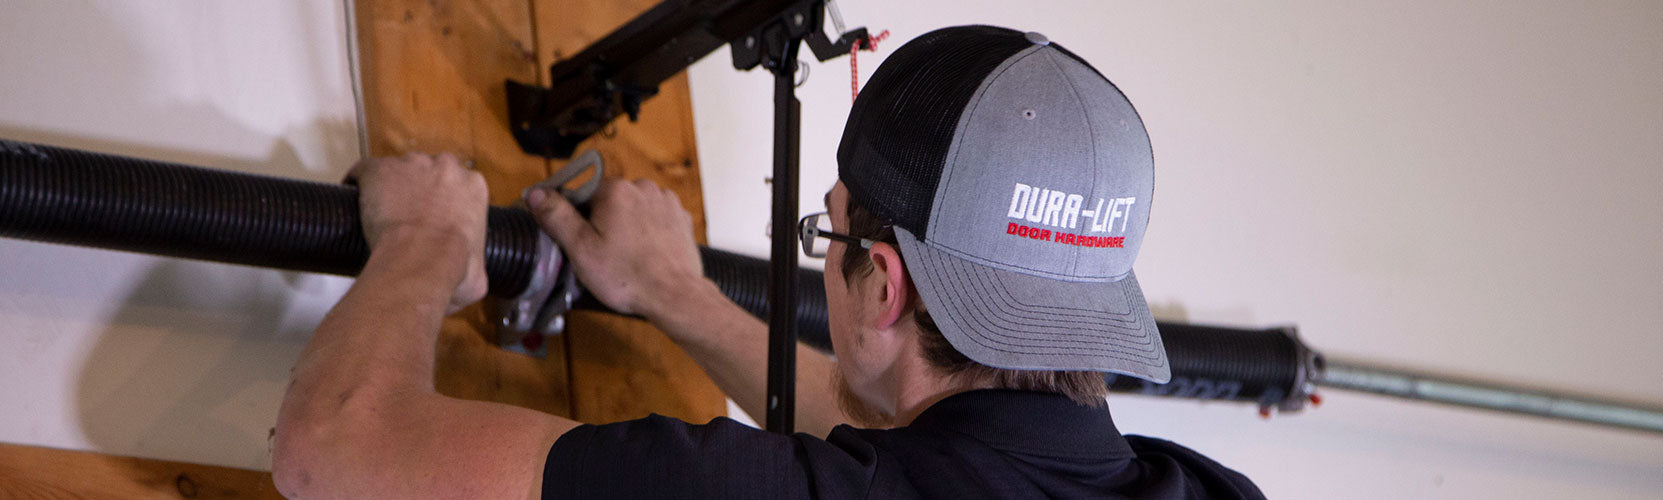
Step 7: Tighten the springs to the torsion bar
Use the winding rods to tighten the springs to the torsion bar. Torsion springs should be wound four quarter turns per foot of door height, plus an extra two turns.
For example, if your garage door is 7 feet tall, you would wind each torsion spring 30 quarter turns (7 feet x 4 quarter turns plus two extra turns)
Step 8: Tighten screws on torsion springs and test tension
Once you're done winding your springs, keep a winding rod resting on the garage door header and tighten the set screws on the spring with a socket wrench.
Test the tension of your door to make sure that the springs have been wound the correct number of times. This is important in ensuring that your garage door can open and close properly.
To do this, lift the door to the halfway position. If the door moves up on its own, the torsion springs have been wound too much. In this case, unwind each spring one or two quarter turns and test again.
If the door moves down on its own, the springs haven't been wound enough times. In this case, wind each spring one or two more quarter turns and test again.
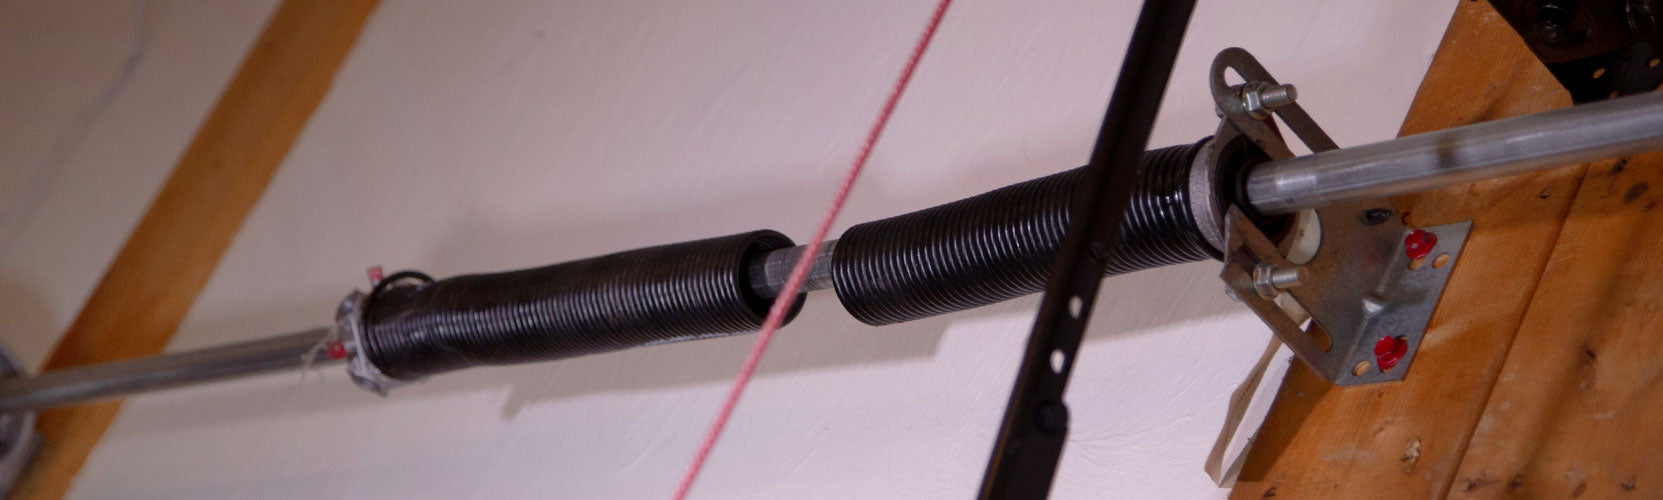
When the springs are wound correctly, the door will balance in the halfway open position, as shown below.
Once the door is balanced, reengage the operator and test the door the make sure that it opens and closes properly.
Congratulations! You have successfully replaced your garage door torsion springs. If you need further assistance, contact us with any questions or concerns. Be sure to check out our other tutorials for more garage door resources.

How to Measure Garage Door Torsion Springs

What To Do If Your Torsion Springs Were Replaced Incorrectly
Step 1. Measure your current springs
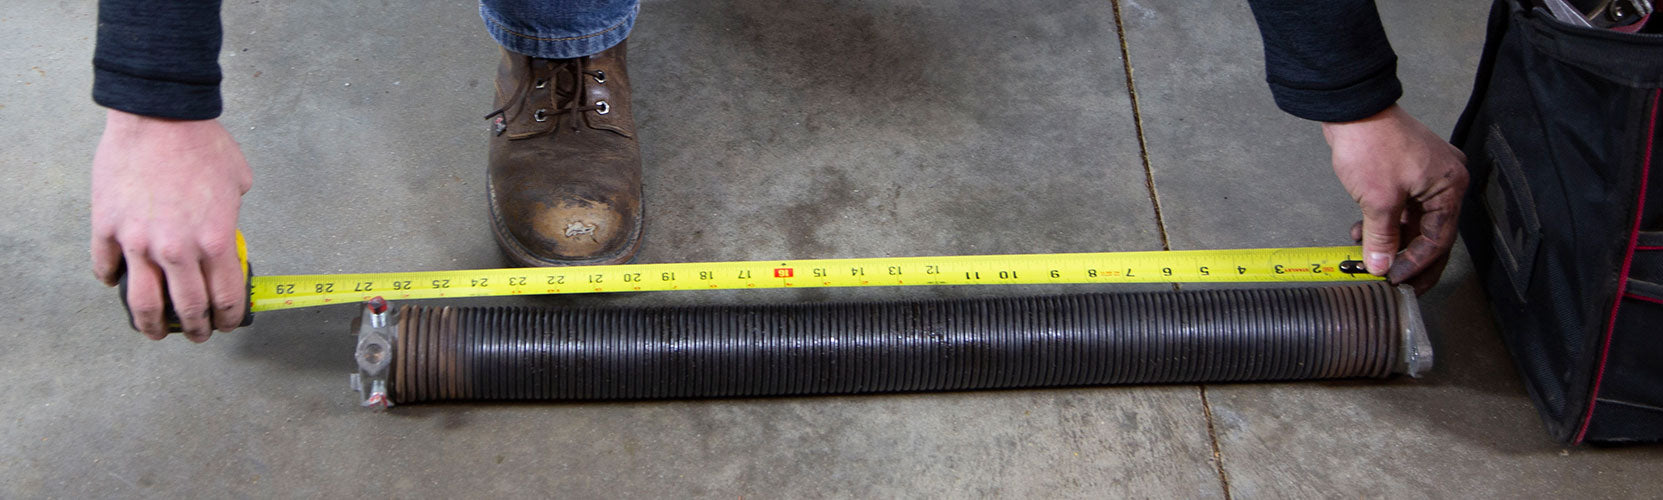
Step 1a: Measure out 20 coils on the spring.
Count out 20 coils on your torsion spring and measure them with your tape measure. This measurement determines the wire gauge, which corresponds to the color painted on the spring. Refer to the table below to determine your wire gauge based on the spring color and/or 20 coil measurement.
Step 1b: Measure the overall "coil to coil" spring length.
Measure your spring from wire to wire. Do not include the winding or stationary cones in this measurement. When looking for a replacement, you can safely increase or decrease the length by one inch if necessary.
Step 1c: Measure the inner diameter of the spring.
Use your tape measure to find the inside diameter of your spring. This can be measured on a broken spring. The diameter is usually 1-3/4" or 2" for residential doors and larger for commercial doors. The inner diameter is also typically stamped on the winding cone if you are having issues measuring the spring.
Step 2: Measure the height of your door
Measure from the ground to the top of the door. Residential garage doors are typically 7 feet or 8 feet tall.
Step 3: Weigh the door with a bathroom scale.
Remove power from your garage door opener and disengage the opener arm from the garage door panels. Then unwind the torsion springs so that there is no tension on the garage door. Once you have done this, place a bathroom scale at the center of the door to determine the true weight of the garage door.
Step 4: Measure the drum diameter.
The drums are located on the ends of the torsion shaft. These are the hardware that lift the cables up. The drum size is normally engraved on the side.
Step 5: Measure the track radius.
The track radius is the measurement of the bend in the track. Measure the track radius by measuring the from the top horizontal track to where the vertical track begins to bend.
Step 6: Contact DURA-LIFT Door Hardware.
Once all of these measurements have been completed, please fill out the torsion spring request form so that we can recommend the correct pair of springs for your door.